New perk! Get after it with local recommendations just for you. Discover nearby events, routes out your door, and hidden gems when you sign up for the Local Running Drop.
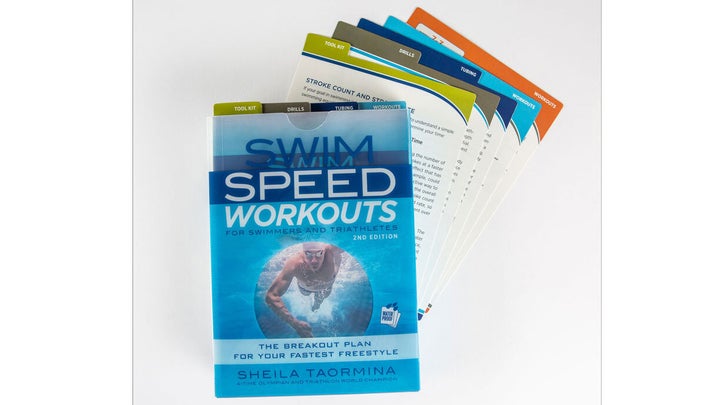
There’s no more effective tool for specifically developing the strength and flexibility for the underwater pull than tubing. It was my secret weapon when I trained and raced, so it’s a mainstay in my Swim Speed Workouts for Swimmers and Triathletes, 2nd Ed.. Each includes a tubing set, usually at the end of the swim but occasionally at the beginning. The total time it takes to do the tubing set on each workout is approximately 10 minutes. If you don’t have access to a pool right now, the tubing sets alone are a great alternative to getting in the water.
Keep in mind that tubing is essentially a weight training workout, so three times per week is the recommended amount (don’t exceed four times per week).

Of the tubing products on the market, I prefer Halo. I like the handle design, and the tubing comes in varying levels of resistance that are color-coded accordingly. Yellow is the lightest resistance, red is medium, and blue is the heaviest level of resistance. Eighty percent of swimmers will benefit most using the red tubing. If you have a swim background or have done resistance/ weight training regularly, then blue may be a good option. Yellow is best for children (age 12 or younger) or for adults who have a shoulder injury or have very little base upper-body strength.
Tubing Technique
Whether you’re on a bench or standing with tubing only, and whether you’re pulling fly or free, the technique on full pulls is the same.
Place your hands between the plastic handle and nylon strap. Cinch the strap around your hands such that you can hold hands flat and open, with straightened fingers; no cupping of the hand.
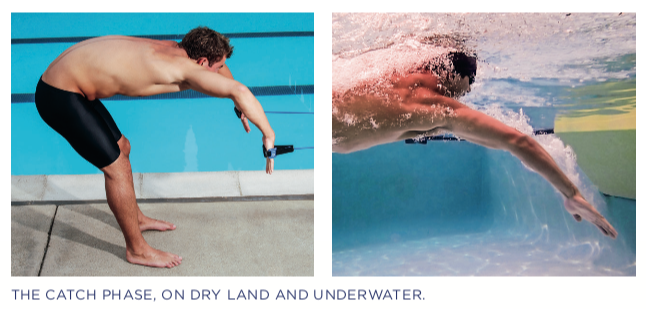
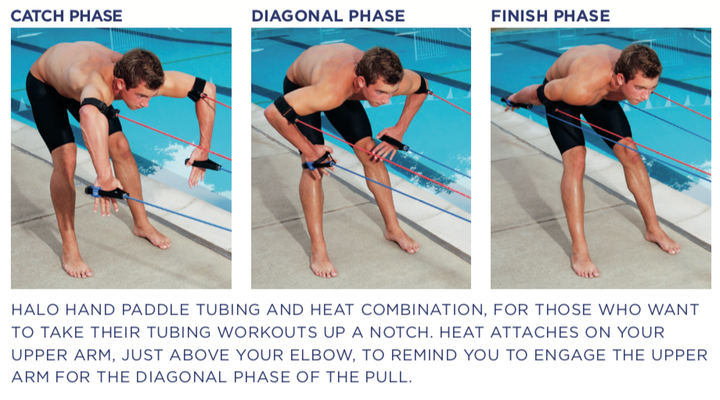
Extension: Extend your hands/arms forward directly in front of your shoulder, with arm straight, for the extension phase of the stroke.
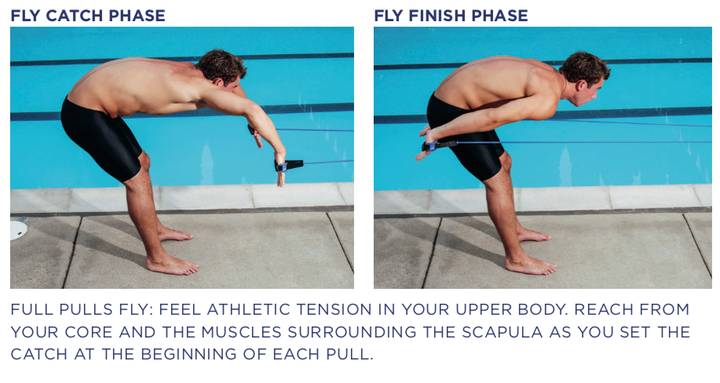
Catch: Keep your upper arm extended forward by reaching with the muscles that attach to your scapula. Your elbow should stay in front of the crown of your head as you medially rotate your upper arm to direct the elbow slightly up, sweep the upper arm (and hand/forearm) 4–8 inches wider than shoulder width, and bend the elbow so the hand directs down to achieve catch depth (1–2 feet below head height).
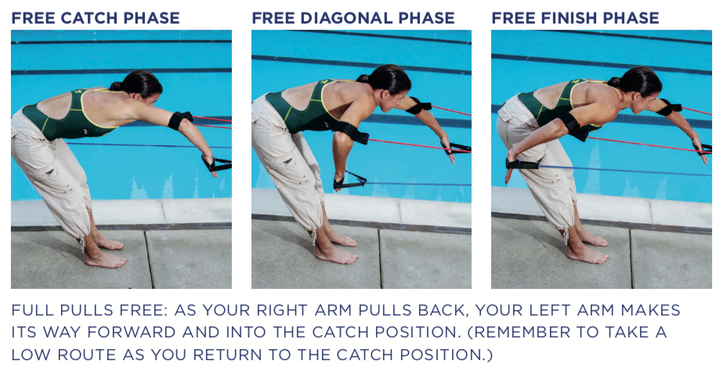
Diagonal: After making the catch, begin to press back with the upper arm and hand to start the diagonal phase of the pull. Maintain stable oarlocks as you un-rotate the upper arm, adducting the arm toward the midline of the body. Your elbow should now point to the side as opposed to pointing slightly up. Your hands should press diagonally back rather than straight back.
Finish: Once you’ve pulled under your belly button to finish the diagonal phase, pitch your hands to direct toward your hip. Straighten the arm as you do so. It is important to note that the straightening of the arm does not simu- late what you do at the finish of the stroke in the water. While swimming, keep your elbow bent for the finish as you lift your upper arm from the water. With tubing we cannot lift our upper arm above our body, as there is risk of the tubing abruptly pulling your arm forward and causing shoulder injury. While we do not simulate the technique of the stroke at the finish, we get a fantastic upper arm strength workout by straightening the arm.
Recovery: At no point during the tubing exercise should your hands/arms be above your body. With tubing, do not recover the hands/arms forward over your head as you would when swimming, as this risks injury to your shoulder. Rather, after finishing with straight arms, keep the arms straight and recover forward with hands near the ground. Return with straight arms low to the ground all the way into straight-arm extension to begin the next pull.
Free vs. Fly
Tubing may be done by pulling both arms back at the same time (butterfly) or by pulling one arm back at a time, alternating arms (freestyle). Sets call for both. Arm positioning and technique for the pull-back, whether doing fly or free, is the same. You’ll feel your core work more when you do the butterfly, since you’re setting the catch with two arms simultaneously. Although the core works more vigorously during butterfly, the pull-back is simpler to coordinate with two arms pulling synchronously.
When learning tubing, freestyle can be difficult because your arms move asynchronously and must be timed as one pulls back and the other returns to the start position. At first, go slowly, even pausing between pulls if needed. Eventually, as the technique becomes more natural, feel the rhythm and timing of both arms; this will translate beautifully into timing and rhythm in the water. It could take weeks or months of consistent effort to find your strength and rhythm, so don’t rush the process. The proper pull technique must be established before incorporating tempo, rhythm, and timing. Patience will pay off.
Also note that when the tubing set on the workout card calls for “full pulls,” one repetition is a full arm cycle, which means that you must pull back with the right hand and the left hand to equal one full pull.
Triceps-Only Exercise
Many of the tubing sets in the workouts incorporate triceps-only tubing. This exercise is a short motion that trains upper arm strength.
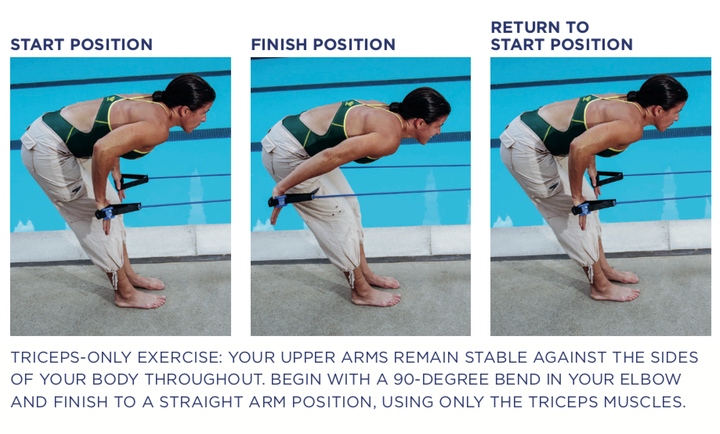
Begin with your hands just in front of the outside edge of your hips, alongside your upper thigh, fingertips and forearms pointing vertically toward the ground. There should be a 90-degree bend in your elbows. Your upper arms should be against the sides of your body, and they remain stable in this position throughout the exercise; this requires great stability strength in the shoulders and core, and for many people this is the most difficult part of the exercise. Use your tricep muscles to straighten the arms from the 90-degree bent elbow position to a straight arm position by pressing your hands back to finish just past your hips. It is a very short motion. Do not swing from the shoulders, sweeping your upper arms back and forth. Keep the upper arms stable alongside your body to isolate the tricep action.
After finishing the press back to a straight-arm position, return to the start position by bending again at your elbows, taking the same yet reversed path as the press-back.

This exercise may look simple, but it’s actually one of the toughest in the book. You’ll feel a good burn, and your swimming strength will grow to new heights if done properly.
Using the Halo Bench
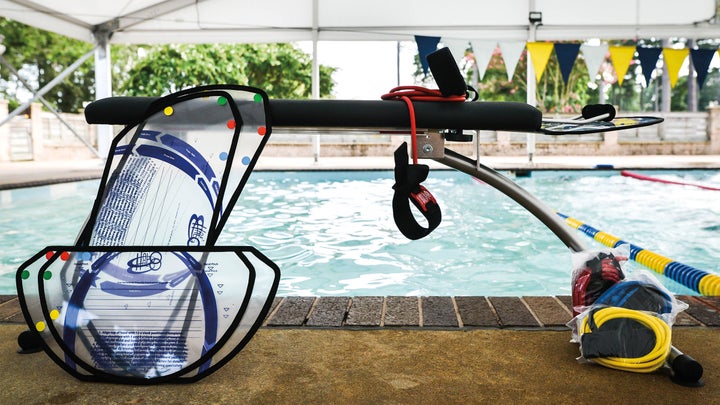
Tubing exercises can be done on a Halo bench. It comes with a template to guide the arms through the correct pull pattern. Since the catch phase of the stroke is the least likely to be naturally present in a swimmer’s stroke, the bench template is especially beneficial for this phase.
The swimmer must reach forward and over the template to set the catch position and then pull back, using the template as a guide. The template narrows at the point where your hand/forearm presses back under your head, which directs the hand/forearm through the diagonal phase of the stroke. Brush attachments on the bench near the hips and upper thighs remind the swimmer to finish near the hip rather than out wide.
On the bench you also have the benefit of working horizontally, to simulate your swimming position. This strengthens the muscles in your core and legs.

Hold the correct athletic tension in your core and legs as you pull, as this will translate into core strength while swimming.
The bench also comes with a tempo trainer. Once a swimmer has established the proper technique, tempo and rhythm can be added to the training sets. I explain the race tempos of Olympic swimmers in Swim Speed Secrets, 2nd edition, which can be used as a guide for tempo training with Halo tubing.
Halo Heat
HEAT stands for “high-elbow attachment tubing.” The design is similar to Halo hand paddle tubing; however, rather than a nylon strap that cinches around the hand, HEAT comes with an arm cuff that fits just above the elbow, on the upper arm. HEAT teaches the swimmer to engage the upper arm for the diagonal phase of the pull. When HEAT is used together with Halo hand paddle tubing, the swimmer builds strength in both the hand/forearm and the upper arm during the pull.
HEAT is designed to be used with hand paddle tubing, not alone (using HEAT alone doesn’t train the muscles properly since the hand is taken out of the equation). The technique when incorporating HEAT is the same as when using hand paddle tubing only. The combination of the two increases the workload, so it’s a tougher workout than using hand paddle tubing alone. The tubing workouts don’t require that you add HEAT to the mix, but I highly recommend doing so when you feel strong enough.
When considering resistance levels, it’s acceptable to use the same resistance on HEAT that you use on the hand paddle tubing (see Tubing Introduction card). If the resistance with that combination is too much, go down one level of resistance on HEAT. For example, if you use heavy resistance on the hand paddle (blue), you may choose medium resistance for HEAT (red), as depicted in the photos on this card. Going up a level of resistance on HEAT isn’t recommended, as this doesn’t effectively balance the workload between your upper arm and hand/forearm.
3 Sample Tubing Workouts
Though most of the workouts in Swim Speed Workouts for Swimmers and Triathletes, 2nd Ed. are centered around getting in the pool, several sets do include tubing work. Do the tubing work now and then when you can get back in the pool you’ll have a whole collection of workout cards to take with you.
Tubing Workout #1
Rest 1:00-1:30 between sets
4×(15–25 full pulls)
Odd sets free, even sets fly
Tubing Workout #2
Rest 1:00-1:30 between sets
5x
(10–15 full pulls
5–10 triceps-only)
Free or fly, your choice
Rounds 1, 3, 5: Focus on catch during full pulls
Rounds 2, 4: Focus on diagonal phase during full pulls, especially stable oarlocks
Triceps-only: Focus on keeping upper arm stable against the side of the body
Tubing Workout #3:
Rest 1:30 between sets
6×1:30 full pulls
Odd sets free, even sets fly
Republished from Swim Speed Workouts for Swimmers and Triathletes, 2nd Ed. with permission of VeloPress.